Tile Mural Installation Specifications
Custom tile murals are architectural tile systems designed for long-term durability in residential, hospitality, and commercial environments. Proper installation methods ensure the artwork remains visually accurate, structurally secure, and resistant to moisture, cleaning, and environmental exposure.
This guide outlines recommended installation practices for custom ceramic and porcelain tile murals and medallions produced by Custom Tiles. Additional performance data and material guidance are available in our printed tile technical specifications. Note for glass: Glass Tile Installation Instructions.
Quick Installation Reference
Custom tile murals are installed using standard ceramic tile installation methods with polymer-modified thin-set mortar and conventional grout systems. Each mural or floor medallion is shipped with a numbered layout guide identifying the row and column placement of every tile.
• Install over cement backer board, mortar bed, or properly prepared concrete.
• Use polymer-modified thin-set mortar suitable for ceramic or porcelain tile.
• Follow the numbered tile layout guide provided with every mural.
• Use conventional grout or epoxy grout depending on project requirements.
• For indoor ceramic and tumbled tile murals, unsanded grout is recommended.
• Typical grout joints range from 1/16″ to 1/8″.
Tile Mural Installation Overview
Custom tile murals are installed using standard ceramic tile installation methods, similar to other architectural tile assemblies. The printed imagery is permanently fused into the tile surface during the firing process and does not require special sealing or protective coatings.
Typical installations include:
• Interior wall murals
• Shower wall installations
• Kitchen backsplashes
• Feature walls
• Hospitality and commercial environments
• Architectural focal installations
View examples of completed custom tile mural installations across bathrooms, kitchen backsplashes, floor tile projects, and architectural environments.
The installation surface, adhesive selection, and grout type should follow industry best practices for ceramic tile installation.
Tile Substrate Requirements
Tile murals must be installed over a stable, flat, and properly prepared tile substrate consistent with standard ceramic tile installation practices. General material performance data and tile system characteristics can be reviewed in our printed tile technical specifications.
Acceptable substrates typically include:
• Cement backer board
• Fiber-cement tile backer panels
• Properly prepared mortar beds
• Concrete surfaces
• Approved tile installation panels
The installation surface must be structurally sound, clean, and free of dust, oils, or contaminants that could interfere with thin-set mortar adhesion.
Thin-Set Mortar Selection
Use a high-quality polymer-modified thin-set mortar suitable for ceramic or porcelain tile.
Recommended mortar characteristics include:
• ANSI A118.4 or A118.15 compliant
• Designed for wall tile installations
• Suitable for the installation environment
Thin-set mortar should be applied with an appropriate notched trowel to achieve full mortar coverage behind the tiles.
Tile Layout and Alignment
Custom tile murals are produced with individual tiles arranged in a numbered installation layout.
Before installation:
1. Lay out the tiles on a clean surface.
2. Confirm image alignment.
3. Identify tile numbering or layout guides provided with the mural.
Beginning from the recommended reference point helps ensure accurate alignment of the mural image.
Mural Tile Layout Example
Custom tile murals are typically installed using a stacked tile layout, where grout joints align vertically and horizontally across the mural. This maintains perfect alignment of the printed image.
In some installations, a 50-50 offset (running bond) layout may be requested for aesthetic reasons. Because mural artwork must be digitally prepared to account for this staggered arrangement, offset layouts require additional production setup and may increase print preparation costs slightly.
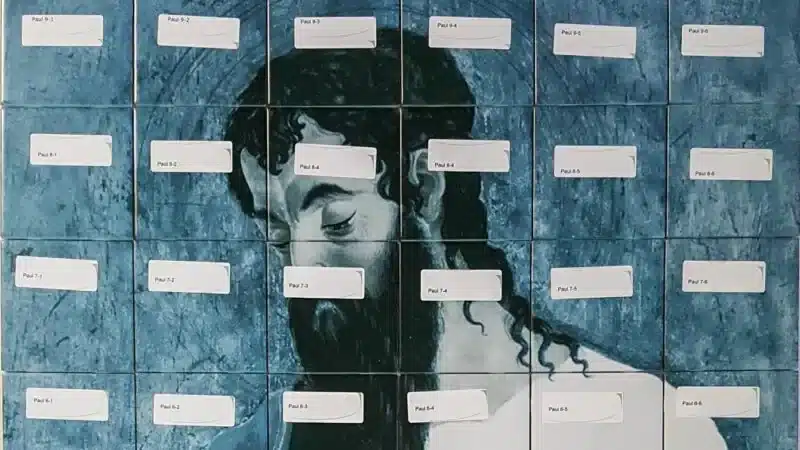
The diagrams below illustrate both layout methods. Tile numbering begins at the bottom row to reflect typical installation sequencing.
Tile Mural Numbered Layout Example
Tile Mural Grout Recommendations
Custom tile murals are compatible with conventional cementitious grout systems as well as epoxy grout where enhanced stain resistance or chemical resistance is required.
For most installations, standard cement-based grout products may be used according to manufacturer instructions.
Recommended grout characteristics:
• Conventional cementitious grout suitable for ceramic or porcelain tile
• Epoxy grout where increased stain resistance or chemical durability is desired
• Grout appropriate for the selected joint width
For installations using our indoor-use ceramic and tumbled tile product line, unsanded grout is recommended. Unsanded grout helps reduce the possibility of surface abrasion during installation and is well suited for narrow grout joints commonly used with decorative tile murals.
Grout Joint Width
Typical grout joints for mural installations are:
• 1/16 inch
• 1/8 inch
Consistent grout spacing helps preserve the visual continuity of the mural image. In case of substrate movement, grout spacing allows the tile system to expand and contract without cracking, buckling, or bonding failure.
Installation in Wet Environments
Custom tile murals can be installed in wet areas when proper waterproofing methods are used.
Common wet-area applications include:
• Shower walls
• Spa environments
• Bathroom installations
• Decorative water features
Custom tile murals are commonly installed on interior wet surfaces including bathroom and shower tile murals, spa walls, and kitchen backsplashes.
Proper waterproof membranes and appropriate thin-set mortar should always be used in wet installations. We are members of the Tile Council of North America and are pleased to offer guidance.
Cleaning After Installation
After grout curing, the mural surface can be cleaned using standard tile cleaning methods.
Recommended cleaning methods include mild pH-neutral tile cleaners, warm water, and soft cloths or non-abrasive sponges. Avoid acids and cleansers containing ammonia.
Long-Term Durability
The decorative imagery on Custom Tiles’ outdoor murals and floor tiles is kiln-fired into the tile surface, creating a permanent finish resistant to fading, moisture, graffiti-removing chemicals, and normal cleaning.
Properly installed tile murals can maintain their appearance for decades in residential, commercial, and institutional environments. The low maintenance feature makes these products economical and attractive for outdoor public art.
These tile systems are frequently specified for hospitality and commercial tile installations where durability and long-term visual performance are critical.
Tile Mural Installer Notes
Every tile mural and floor medallion is shipped with a numbered layout image identifying the row and column position of each tile. This layout guide should be reviewed before installation to confirm the correct orientation and placement of all tiles.
Dry Layout (Optional but Recommended)
Although installation can be performed directly using the numbered layout guide, many installers choose to perform a dry layout first. This allows confirmation of tile alignment and overall mural positioning before thin-set mortar is applied.
Reference Photo
If a dry layout is performed, taking a quick photograph of the arranged tiles can provide a helpful visual reference during installation.
Tile Mural Installation FAQ
How are tile murals installed?
Tile murals are installed using standard ceramic tile installation methods with polymer-modified thin-set mortar and conventional grout systems. Each mural includes a numbered layout guide showing the row and column position of every tile.
What grout should be used for tile murals?
Most installations use conventional cementitious grout or epoxy grout depending on durability and stain-resistance requirements. For indoor ceramic and tumbled tile murals, unsanded grout is recommended.
Do tile murals require sealing?
The decorative imagery is protected by a durable glaze on the tile surface and does not require protective coatings or special sealing. However, grout or natural stone components may require sealing depending on the materials used.
How long do tile murals last?
Tile murals produced using kiln-fired ceramic or porcelain tile printing will last for many decades in both residential and commercial environments – including outdoors in any climate. Because the decorative imagery is permanently fused into the tile surface during firing, it resists fading, moisture exposure, and cleaning.